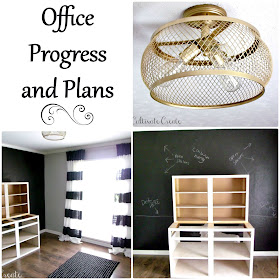
Progress on our office has been at a snail's pace for a long time. We've had a plan, and upper and lower cabinets for built-in's for a long time as well, but just haven't been able to get much of anything accomplished. But, we have finally made a little bit of headway. I had a deadline for a couple of articles for Southern Holiday Life, and that helped light a fire under me to get busy on this room once again.
Before I could take photos for the article, I really needed to get a new light fixture in here. The light that was in here when we bought the house was a pretty chandelier, but it just wasn't going to work for an office. (This room was actually the formal dining room, but we felt that it was too small to use the space that way. It's the perfect size for an office, though.) I got rid of the chandelier, then we had added a cafe light strictly for temporary use.
 |
| Temporary cafe light. |
I knew that I wanted a gold light for this room, but finding a flush mount or semi-flush mount gold light was another story. We decided to purchase one that was the shape we wanted and I would spray paint it gold.
I really liked this Kichler Bronze Metal fixture. It's not your run-of-the-mill light, and I really liked the exposed vintage style bulbs. And at a great price point, we went ahead with the purchase and I used my favorite gold spray paint to make it just right.
Aren't those bulbs so pretty? I love the light painted gold!
Next, we had to remove the back panel of the lower cabinet for the office built-ins so that it wouldn't cover up the electrical outlets and internet cable access. Once we, and by we I mean my husband, removed the back panel, we slid the cabinet roughly into to place. (Oh, and by the way, I painted a black focal wall so that the white cabinets would really pop. I'm really loving black walls right now. So dramatic and sophisticated!)
We couldn't slide the cabinet all the way back because of the base trim and cords along the wall. We'll have to cut the trim and notch the right hand shelf in order to make the cabinet flush, but still allow for the electrical. Also, that is an upper cabinet just sitting on top of the lowers. The plan for this space is to have the cabinets center, a wood countertop to run the length of the entire wall so that there will be two "desk" areas on either side of the lower cabinet, and open shelving to extend the length of the wall on either side of the upper cabinet.
I moved the DIY black and white striped curtains that were in my daughter's bedroom into this space and I really like them here for now. They really pop off of the gray wall and I like how they coordinate with the black wall.
I drew it out to help us get more of a visual. Now, we're going to call on a carpenter to help us with the details of finishing the space out. I want to make sure we do this right, and that means trim detail that feels a bit over our heads. I hope to have another update soon!


No comments:
Post a Comment