Wednesday, November 26, 2014

Paper Fan Ornaments

I haven't used red and green in my Christmas decorating for the past two years, favoring gold and silver. This year, I just couldn't stand it anymore. I HAD to bring red and green back, but I opted to add in some blues as well. In my mind, I envisioned a tree with a vintage flair.....and adding the blue gave me the look I was going for. But the real stars of this tree are the paper fan ornaments that with just a little modification, made all the difference. 


Gather your supplies:

*Paper fans (I found mine at Wal-Mart in the party supply section.)
*Stickers or embellishments
*Paper
*Glue
*Glitter

In order to specialize these generic paper fans for my tree, I cut circles out of white paper. Then I added glitter to the edges of the circle and embellished with a sticker in the center. Lastly, I affixed it to the center of the fan. Easy peasy.   


I realize paper fans are a little unconventional for a tree ornament, but I really love the bold impact they give! 

I truly hope you have an amazing Thanksgiving! I'm signing off until next Monday, taking time to spend with family and friends, and perhaps to shop a bit. Monday, there's more Christmas DIY and crafts that I can't wait to show you. See you then!

Linking up to:
Creative Spark Link Party

Tuesday, November 25, 2014

Advent Calendar


This is probably only the second time that I've ever done an Advent calendar for my girls.  This year, I decided I definitely wanted to create one that not only gave my girls a small treat each day, but helped them to remember what the Christmas season is all about. 


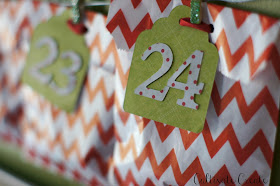
 I have had this extra large frame for a few years now, and the last couple of Christmases, it was where I would hang all of the Christmas cards we received. This year, it is housing our treat bag advent calendar. I ordered these treat bags from Jane.com (which is one of those daily deals sites. They have party and craft supplies often.) 


I used a Cricut to cut out the gift tags and numbers from scrapbook paper. I love how they turned out, and they are sturdy enough that I should be able to use them again next year. Also, I painted and glittered small clothespins that I found in the craft section at Wal-Mart. They were the perfect size to hold each treat bag. 


I filled each bag with some candy and either scripture or something for us to do, including giving to others. I want them to get that Christmas isn't all about them or about getting, but it's about Christ and giving.  I didn't type out each verse because my girls are old enough to look the scripture up themselves. I decided to use the time for them to practice looking up scripture. I tried to equally divide the scripture days with activity days, and had my calendar ready when I stuffed the bags to make sure the activity days weren't busy days for us. 

Below, I have included a free printable of the scripture and activities that I used. Feel free to download and print so you can include in your own advent calendar.  (I just printed, cut into strips, and folded to put into each bag.) 

To download and print, click HERE.


To download and print, click HERE.


To download and print, click HERE.

Free printable for personal use only. Copyright 2014 Cultivate Create.

Linking up to:
Make it Pretty Monday
Creative Spark

Monday, November 24, 2014

Updated Christmas Village

I cannot believe that this is Thanksgiving week! It absolutely baffles me how quickly this year has flown by!  (And don't we have so much to be thankful for!) 

I'm kicking off this week with a few Christmas crafts and DIY's to help get you into the holiday spirit! Each day this week and next week (with the exception of Thanksgiving) I will be sharing some festive holiday crafts! I have SO much to show you, but today I'm starting with an updated Christmas village. 

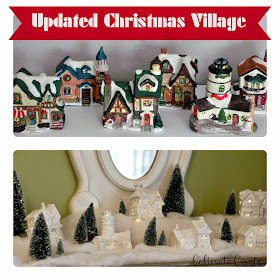
My grandmother gave me this village last year after Christmas. I'm not sure how old it is, or even where it came from. I knew, though, that I could update with some crisp white paint and glitter.  This would be a very inexpensive and easy project......little houses like these are readily available at Wal-Mart, dollar stores, and you could probably find some at thrift stores. A can of white paint and a container of glitter is all you need to give them some love.


//During the glittering process. Via Instagram//
I really love how my little houses turned out! It's amazing to me what some white paint can do to update things. Here is my little village styled for Christmas atop my antique pie safe....


I love little bottle brush trees. I have used them in a few places in my holiday decorating this year. 


This little village gives off such a soft, warm glow at night! It gives just the right amount of light to this corner in my dining room! 

Linking up to:
Make it Pretty Monday
Creative Spark

Friday, November 21, 2014

Frugal Debt Free Life Podcast

Decorating on a Small Budget

Happy Friday! I wanted to stop in this morning to tell you about the Frugal Debt Free Life Podcast.  I had the privilege of being interviewed by Lydia of Frugal Debt Free Life (formerly Five 4 Five Meals) about decorating on a small budget. It was so fun to talk to her and share some of my tips for creating a welcoming home when the budget is tight, and ways to save money when buying home decor and accents. 

Speaking of accents, my Southern drawl is very apparent during this podcast (Lydia even points it out in the beginning, which is too funny). And my goofiness makes a bit of an appearance,too.  But, it was loads of fun and I think you will enjoy it!

You can learn more about the Frugal Debt Free Life: Decorating on a Small Budget podcast and listen HERE.

Also, go check out Lydia's blog! She has some amazing tips for living a debt free life, yummy recipes, and much more: 

Frugal Gift Guide


Frugal Living

Have a wonderful weekend! Come back Monday for the start of my Christmas craft series!

Monday, November 17, 2014

Busy as a Bee

Guys, I have been hard pressed to get a blog post up the past couple of weeks. I have been sooooo very busy. Ever since we got back home from our vacation, it has been non-stop and I feel like I just can't get caught up. But, I finally had some time today to update you a little about what has been going on around here. 


Ever since our living room switcharoo, I have been feeling that this turquoise painted in our built-ins was a little too bold. I have slowly been trying to tone things down and make it flow more with our new dining room/living room situation. So, I painted it black, just like in the living room. 


I put it off for a while because I knew that I would have a huge mess on my hands.  It was worth it, though. I felt that the way I had the bookcase "styled" was too jumbly and messy anyway. (I had resorted to just throwing stuff up there.) 


I have to show you the end result when I share my Christmas home tour soon. It looks so much better now. 


//Beautiful banister with lime green and red chevron ribbon my client picked out. How festive! Via Instagram//
 I had two client projects this week......one was decorating for Christmas and the other was starting on a new studio design for my friend Heather of Newman's Photography. Her studio is her grandparent's old home. She decided it was time to give a facelift. Here are some of the befores.


Isn't that shiplap amazing?  I couldn't wait to get it painted!


And this photo is one Heather posted after she and her husband finished painting the shiplap white and after they pulled up all the old linoleum to reveal hardwood floors. The floors just have to be sanded and re-stained now and they will look amazing! I can't wait to get to the fun part.....making everything functional and pretty! This will be Heather's office/sitting room. 


I have also been very busy getting Christmas projects done. I have most of my decorating done, but have also tackled quite a few Christmas crafts that I can't wait to show you!  (Starting next week!!!)  But, I cannot craft without making a huge mess.  My house was coated in a fine layer of glitter for a while. 


//Via Instagram//

After making the trek to Tuscaloosa Saturday to cheer on the Tide, and spending some much needed time with my hubby, I finally feel like I am getting caught up on things.  It seems like November is always so busy getting ready for Thanksgiving and Christmas. And once Thanksgiving is over there is always so very much on the calendar. In order to not get overwhelmed, I'm just trying to take it one day at a time.

Are your November's super busy in anticipation of the holiday season?

Wednesday, November 12, 2014

What You Wish Wednesday #26


Before we get started with WYWW, let me announce the Fall Giveaway winner! 

THE WINNER IS:
Carrie Albrecht


  Congratulations, Carrie. We will be contacting you shortly and sending you your $50 Target Card.  Have fun!!!
· · · · · · · · · · · · · · · · · · · · · · · · · · · · · · · · · · · · · · · · · · · · 


I will pick back up with my top three features from the link party next week. But, for today, let's just get this party started!

WYWW DETAILS:

  • SHARE A RECENT POST FROM YOUR BLOG. 
  • INCLUDE THE WYWW BUTTON (CODE BELOW) AND/OR A VISIBLE LINK-BACK TO THIS POST.  
  • CHECK OUT A FEW OF THE SHARED LINKS.
  • BY SUBMITTING A LINK, YOU ARE GIVING ME AUTHORIZATION TO FEATURE YOUR POST.  IF YOUR POST IS FEATURED, I WILL INCLUDE A PICTURE AND A LINK TO YOUR SITE TO SHARE THE LOVE!
  • FOLLOW ALONG: 


Monday, November 10, 2014

Southern Holiday Life

I was thrilled to be asked to be a contributor for Southern Holiday Life's Christmas edition.  I had so much fun decorating for Christmas (In September) to get everything ready and turned in by deadline. 


The digital edition can now be viewed HERE! Check out the amazing recipes, crafts, and holiday decor in the magazine. (I contributed a red velvet recipe, paper ornament craft, and a funky black, white, and lime green tablescape.)

I hope you enjoy reading!

Linking up to What You Wish Wednesday.

Wednesday, November 05, 2014

What You Wish Wednesday #25 and a Giveaway


Hello and Happy Hump Day!  Do you ever just breath a sigh of relief when you get to Wednesday, knowing that you've made it half way through the work week? I always feel better when mid-week arrives! What You Wish Wednesday (#WYWW) is in full swing, and I can't wait to see what all of you lovelies link up! But, really quickly before we get started with the link party, enter to win our Fall giveaway! A $50 gift to Target will definitely come in handy when hosting for Thanksgiving or marking off some names from you Christmas list!


a Rafflecopter giveaway

And now for the link up!


WYWW DETAILS:

  • SHARE A RECENT POST FROM YOUR BLOG. 
  • INCLUDE THE WYWW BUTTON (CODE BELOW) AND/OR A VISIBLE LINK-BACK TO THIS POST.  
  • CHECK OUT A FEW OF THE SHARED LINKS.
  • BY SUBMITTING A LINK, YOU ARE GIVING ME AUTHORIZATION TO FEATURE YOUR POST.  IF YOUR POST IS FEATURED, I WILL INCLUDE A PICTURE AND A LINK TO YOUR SITE TO SHARE THE LOVE!
  • FOLLOW ALONG: 


Tuesday, November 04, 2014

Let's Gather: Thanksgiving Blog Hop


Hello! I am so glad that you stopped by today!  Welcome to Cultivate Create, Stop 1 on the Let's Gather Thanksgiving Blog Hop! I am super excited to be hosting this hop along with HollyDays Paper, Designs by Miss Mandee, Our Joy His Glory, Nikki's Nacs, and Little Brags. These ladies are all amazingly talented and have some wonderful Thanksgiving inspiration to share with us today. 


Tablescape:

I decided to do a Thanksgiving tablescape. I love to set a pretty table! It makes things so festive and special. I carried some of the elements of my fall dining room into this Thanksgiving set up, such as the dried hydrangeas, and gold and natural pumpkins. I always like to do that, using some of the same items throughout the season, but changing things up a a little as it progresses. I added in a cornucopia and more gold elements to this centerpiece. Plaid fabric pulls in all of the colors of the hydrangeas and pumpkins.  I used wooden stackable files to contain the centerpiece. 


My two favorite things about this tablescape? 1.) My wooden plate chargers I had cut by a local cabinet maker. I painted them black to give visual interest under the white plates. 


2.) The metal gift tags I used to tie the napkins. Instead of assigning seats and listing names here, I decided to hand write sentiments of the holiday. 


This wooden gather sign was meant to sit on a flat surface, but I wanted to put it in the center of my dried hydrangea wreath. I drilled a hole in the top of the sign so I could attach it to the wreath with ribbon. I hung the wreath on the mirror with plaid fabric. 


Kid Craft:

I love involving the kiddos in some of the decorating!  This pumpkin turkey is just the thing for the kids. (We made this turkey for a pumpkin decorating contest for my daughter's third grade class. But now that that is over, it is the perfect kid table decoration!)

Supplies needed:
Pumpkin
Paint
Yarn
Felt
Scrapbook paper
Googly eyes
Hot glue gun and glue.

How-to:
1. Paint pumpkin brown.
2. Cut large feathers out of scrapbook paper. Fold paper feathers in half to crease them.
3. Turn pumpkin on side and glue paper feathers to back. 
4. Glue yarn ball for face to front of pumpkin.
5. Add a beak, eyes, and a wattle made of felt. ( Yes, that red thing that hangs down from a turkey's neck is called a wattle.)
6. Enjoy your turkey!

Also, how adorable would it be to decorate your pumpkin as a pilgrim? So many possibilites!


Now head over to HollyDays Paper for Stop 2 of the Blog Hop for more Thanksgiving inspiration!


Don't miss a stop! There's heaps of Thanksgiving inspiration to go around!